How would you like to make teaching scales and fingering super easy? This lesson is going to transform how you teach scales and fingering to your string classroom, or your private violin, viola, cello or bass students. And it is absolutely fun because once you realize how easy it is going to make everything, you will jump for joy!
For years, I struggled with trying to get students to see the patterns on the fingerboards that seemed obvious enough to me. Why couldn’t they memorize the patterns that seemed so simple? But to most of my students, the fingerboard was a vast uncharted territory that they could never seem to master. As a student, I remember feeling like anything past third position seemed like a mystery to me as well.
Teaching Fingering Can Be Made Easy
I don’t know if many teachers use this method, and I myself have never encountered this at school or in private lessons*. We can transform how we teach fingering if we all set up our students with some basic patterns and vocabulary. This terminology makes it so easy to discuss and correct fingering, teach scales, and teach shifting because the terms are common to all the instruments. There is no need to shout out note names or different fingerings for each instrument, and with the support of a good scale method and good fingering charts, the students will easily learn to figure out fingerings for themselves.
Once you establish the following basics, which only takes one lesson, you not only have the foundation for fingering, shifting and intonation success, I have found that there really is no limit to where you can take your students.
In order not to overwhelm the students with terminology in the beginning, I introduce this after the students have had two or three months of playing, and can play fairly well using tapes on their instrument.
Six Basic Patterns For Teaching Fingering
There are six basic terms you need to establish with your beginner string students that will make fingering not only easy to teach but will actually help them visualize where their notes should be. When I feel that they are ready, here is how I introduce them….
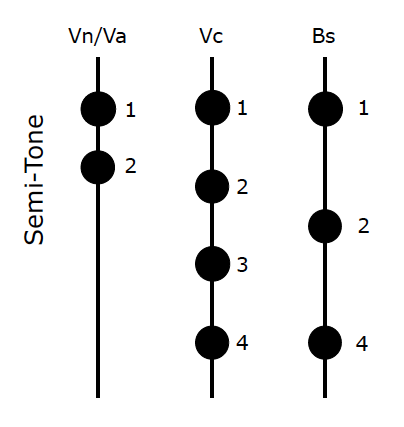
1. Establish how to play SEMI-TONES on each instrument.
- VIOLIN & VIOLA: any two fingers that are touching. Stress to the students that although there is a space on the chart, in reality, their fingers should actually be touching.
- CELLO: any two consecutive fingers.
- BASS: between 1 & 2, or between 2 & 4 (3rd finger is not a note, but can help give the pinky strength)
2. Establish how to play WHOLE-TONES on each instrument.
- VIOLIN & VIOLA: any two fingers that are apart/have a space.
- CELLO: skip a finger, i.e. 1 & 3, or 2 & 4
- BASS: between 1 & 4

3. Name the Major Finger Pattern.
- This is the pattern that they are already familiar with playing.
- Note how the Major Pattern sounds: It sounds like half a scale, and it sounds ‘happy’

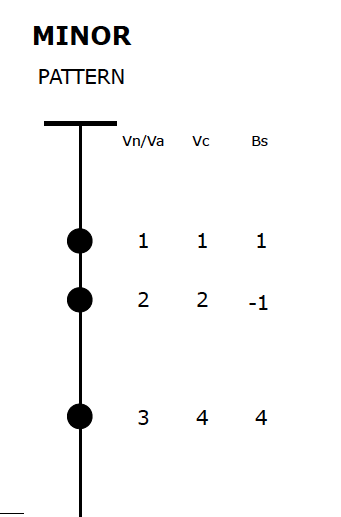
4. Introduce the Minor Finger Pattern.
- Note that the Minor Pattern differs from the Major Pattern by only one note. This puts the semi-tone in a different place.
- Note how the Minor Pattern sounds: It sounds ‘sad’.
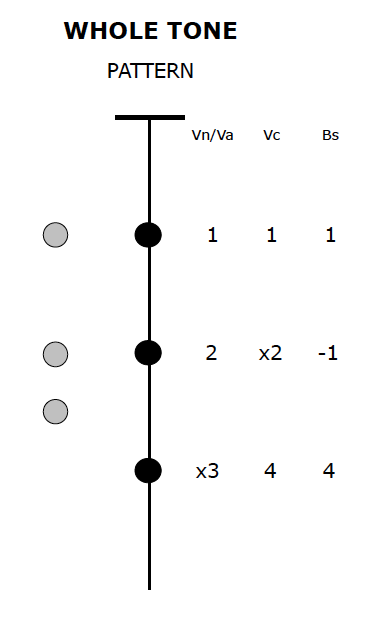
5. Introduce the Whole-Tone Pattern
- This pattern is made up of all whole-tones.
- This pattern involves introducing the extension of the 2nd finger to the cellos.
- Relate the Whole-Tone Pattern back to the Major Pattern so students can see that it only differs from it by one note.
- Its sound: This pattern starts off sounding like the Major Pattern, but the last notes sound… awkward!
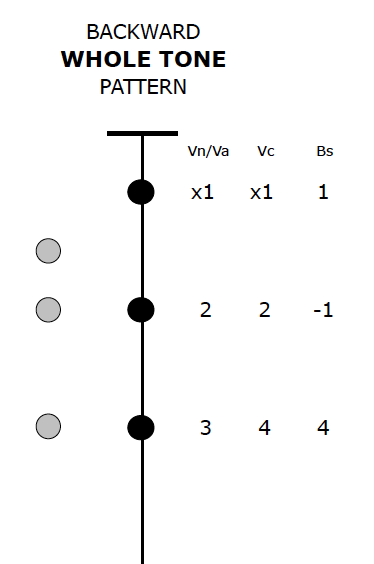
6. Introduce the Backward Whole-Tone Pattern.
- I sometimes save this one for later, depending on how many patterns the student(s) can seem to handle at one time.
- Again, relate this pattern back to the Minor Pattern so the students can see that only the first finger changes by moving back into half position.
- The sound: It sounds somewhat mysterious.
Some Activities:
- When you introduce the whole-tones and semi-tones, get them to guess which one you are playing to see if they can hear the difference.
- Get them to play semi-tones and whole-tones starting on different fingers.
- Introduce the 4th finger semi-tone and whole-tone to the violins and violas.
- Get them to listen and guess which finger pattern you are playing.
- Have the students test each other.
- Have the students play their Beginner Tunes using the Minor Pattern instead of the Major Pattern, just for fun!
Finally, I give the students a very quick quiz to make sure they understand the vocabulary by asking them to demonstrate a semi-tone, whole-tone and each pattern starting on a note or string that I ask for. I also have them draw the fingering patterns for me.
And that’s it! Now you are ready to teach them to read the fingering charts in their scale book, and play in any key and any position you want!
Meanwhile, in the next post in the Teaching Fingering, Shifting and Intonation Without Fear series, we will learn how to put these patterns to work!
*Since writing this post, I have discovered that George Bornoff, another Canadian, advocated and built a method around teaching by finger pattern! Great Canadians think alike!


Leave a Reply